AAI guide for SPs
Overview
This wiki page contains information about connecting services to the NI4OS-Europe Login service in order to enable federated authentication and authorisation.
General Information
NI4OS-Europe Login supports two authentication and authorisation protocols that you can choose from:
- OpenID Connect - an extension to OAuth 2.0
- Security Assertion Markup Language (SAML) 2.0
Regardless of which of the two protocols you are going to use, you need to provide the following information to connect your service to NI4OS-Europe Login:
- Name of the service (in English and optionally in other languages supported by the service)
- Short description of the service
- Website (URL) for localised information about the service; the content found at the URL SHOULD provide more complete information than what provided by the description
- Contact information of the following types:
- Helpdesk/Support contact information - for generic support questions from end-users about the service
- Administrative
- Technical - for technical interoperability problems; the technical contact must be responsible for the technical operation of the service
- Security/incident response
- Privacy statement URL: The privacy policy is used to document the data collected and processed by the service. It should be compliant with the GÉANT Code of Conduct version 1 or any other code of conduct compatible with legislation and guidelines on data protection and privacy including GDPR. You can use the Privacy Policy template.
- Acceptable Use Policy / Terms of Use URL: The Acceptable Use Policy should be based on the WISE AUP Baseline template.
- Logo URL (optional for showing in catalogues); if provided, logos SHOULD:
- use a transparent background where appropriate to facilitate the usage of logos within a user interface
- use PNG, or GIF (less preferred), images
- use HTTPS URLs in order to avoid mixed-content warnings within browsers
- have a size larger than 40000 and smaller than 50000 characters when encoded in base64
OpenID Connect Relying Party
Services can be connected to NI4OS-Europe Login using OpenID Connect (OIDC). NI4OS-Europe Login provides an OpenID Connect (OAuth2) API based on Keycloak, which has been certified by the OpenID Foundation. You need to install an OpenID Connect Relying Party (OIDC RP) software and integrate it into your application. If you are connecting a web application, then you should choose the Authorization Code flow. Please refer to https://openid.net/certification/ for a list of certified relying party library implementations.
Interconnection with the NI4OS-Europe Login OpenID Provider allows users to sign in using any of the supported backend authentication mechanisms, such as institutional identity providers registered with eduGAIN or Social Providers. Once the user has signed in, NI4OS Login can return OIDC Claims containing information about the authenticated user.
Client registration
Before your service can use the NI4OS OIDC Provider for user login, you must register a client in order to obtain OAuth 2.0 credentials and register one or more redirect URIs.
To register your client, please contact aai-support@ni4os.eu. Your request should include the general information about your service (see #General Information) and the protocol-specific details below:
- One or more redirection URIs where the NI4OS OIDC Provider will send responses to your authentication requests. Note that redirection URIs MUST use the
httpsscheme - Token endpoint authentication type - One of the following options:
- Client Secret over HTTP Basic
- Client Secret over HTTP POST
- List of scopes allowed to be requested by your client. The following scopes are available:
openid- required for all OpenID Connect clientsvoperson_id- allows retrieving the user's unique Community User Identifier (CUID) through thevoperson_idclaimprofile- allows retrieving the user's name information through thegiven_name,family_name, andnameclaimsemail- allows retrieving the user's email information through theemailandemail_verifiedclaimseduperson_entitlement- allows retrieving the user's entitlements (group membership & role information) through theeduperson_entitlementclaim
- Contact for receiving PIN to access client credentials - To ensure the security of your client credentials we will send you a PIN (personal identification number) that you need to use in order to access your client credentials. The PIN must be sent through a different means than the email address used to contact us. Please supply a different email address or a keybase, Skype handle.
The configuration of the NI4OS-Europe Login OpenID Provider (OP) is available at https://aai.ni4os.eu/auth/realms/ni4os/.well-known/openid-configuration.
Example OIDC Client Configurations
Keycloak
If you are using Keycloak as an OIDC Relying Party, then you need to follow the steps below in order to register EGI Check-in as an Identity Provider:
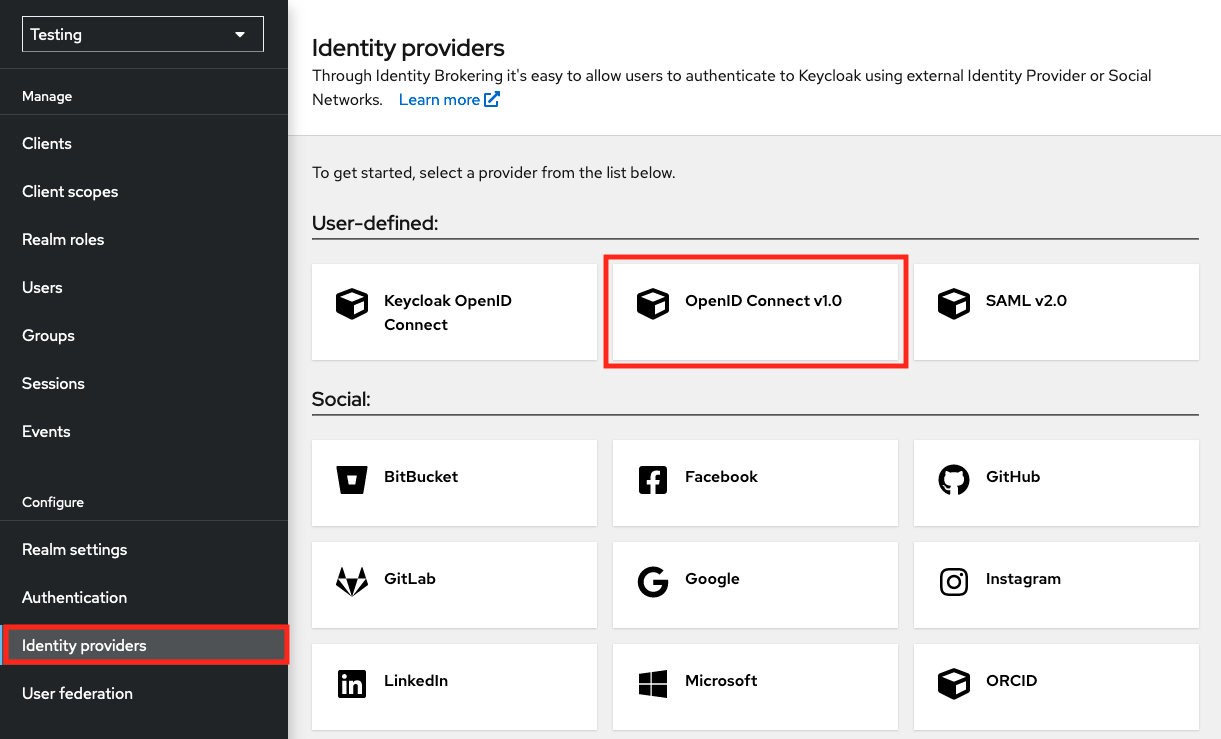
Access the administrator console of your Keycloak instance and navigate to "Identity Providers" and then select "OpenID Connect v1.0"
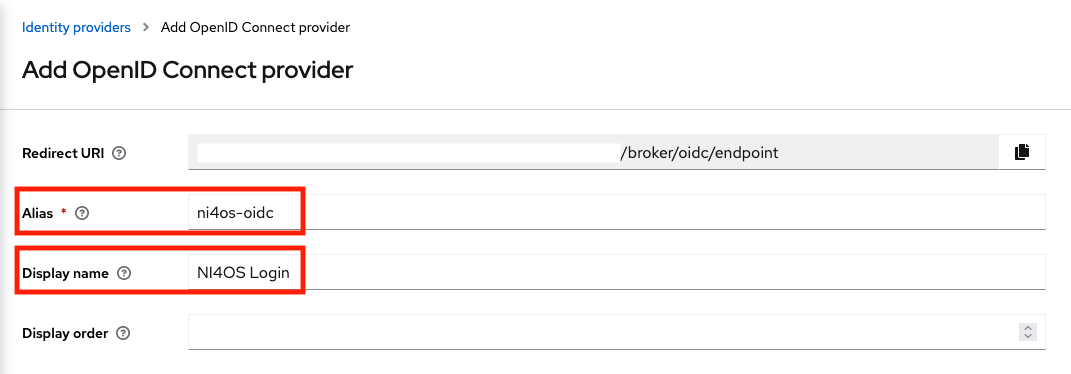
In the next page, complete the following fields:
- Alias:
egi-check-in-oidc - Display name:
EGI Check-in
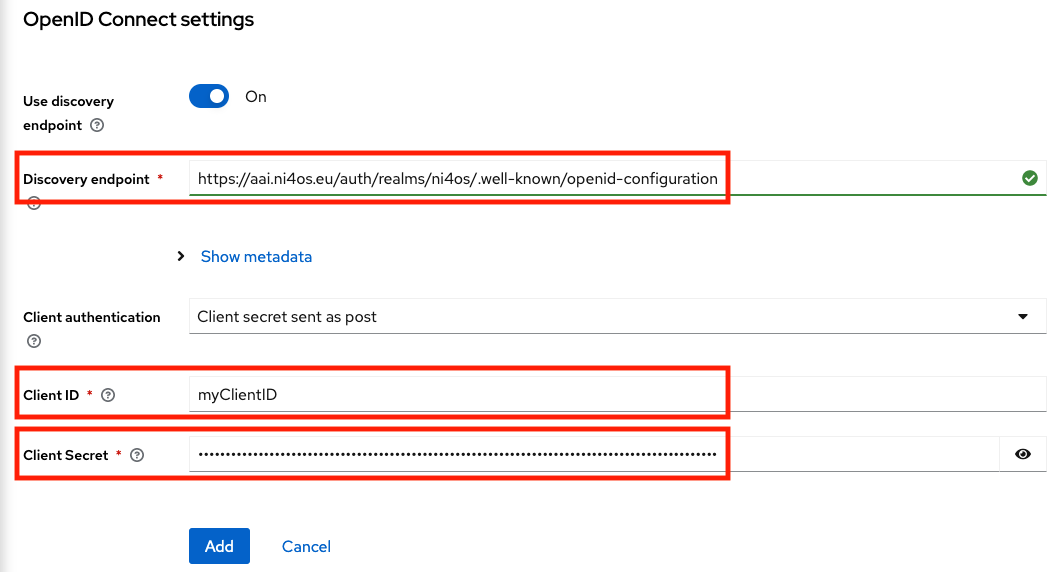
Scroll down, and complete the rest options:
- Discovery endpoint:
https://aai.egi.eu/auth/realms/egi/.well-known/openid-configuration - Client ID:
<YOUR_CLIENT_ID> - Client Secret:
<YOUR_CLIENT_SECRET>
And then click on the "Add" button.
- Alias:
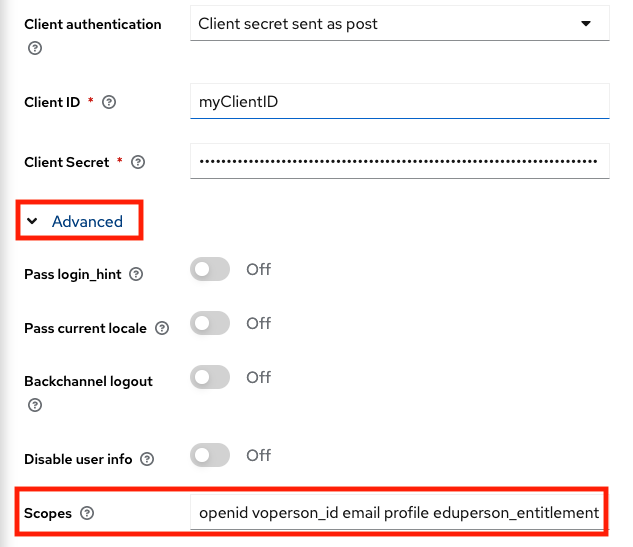
After adding EGI Check-in IdP, scroll down to the "OpenID Connect settings" section and expand the "Advanced" option and then add the scopes that the Service needs. For example:
Scopes:
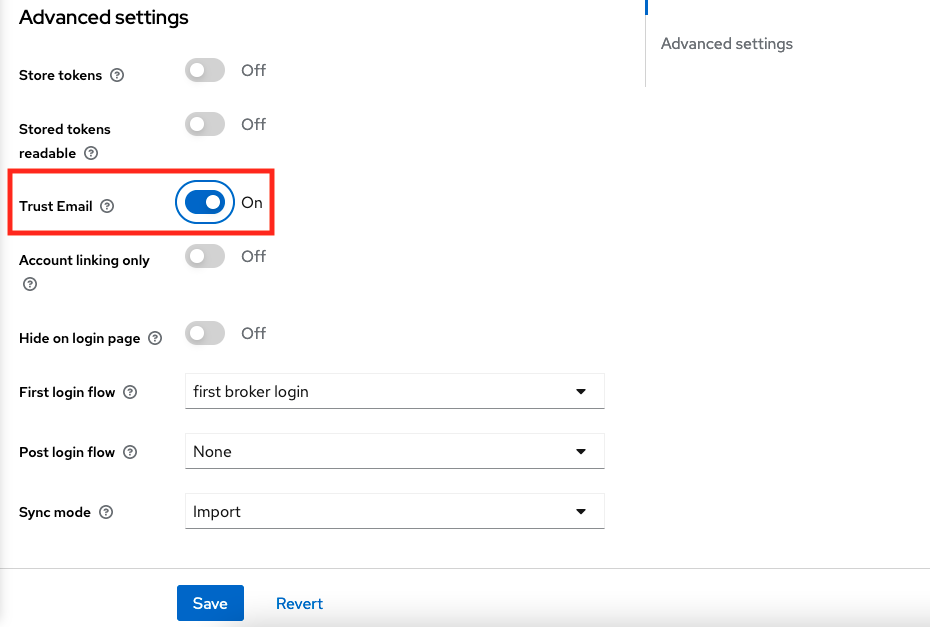
openid voperson_id email profile eduperson_entitlementThen, scroll down to the "Advanced settings" section and enable the "Trust Email" option and click on "Save" button.
Next, you will need to add two mappers to store the
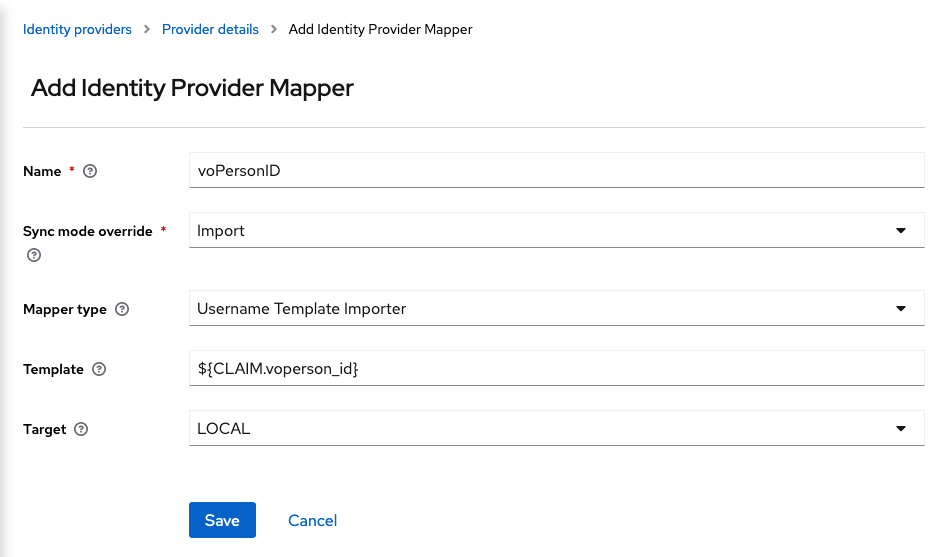
voperson_idand theeduperson_entitlementclaims because Keycloak can map only the standard claims. Go to the "Mappers" tab and then click on "Add Mapper".For the
voperson_idclaim you will need to add the following options:- Name:
voPersonID - Sync Mode Override:
import - Mapper Type:
Username Template Importer - Template:
${CLAIM.voperson_id} - Target:
LOCAL
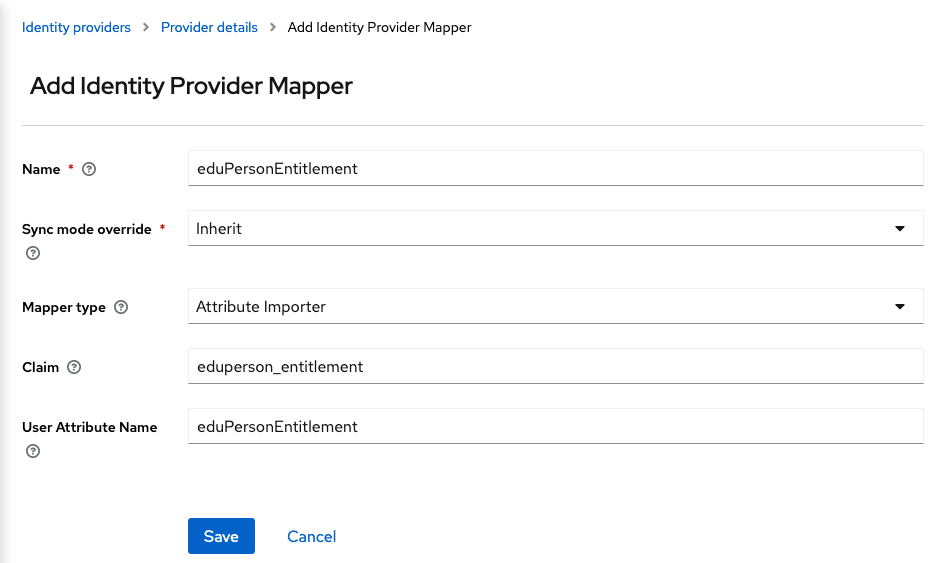
And for the
eduperson_entitlementclaim:- Name:
eduPersonEntitlement - Sync Mode Override:
Inherit - Mapper Type:
Attribute Importer - Claim:
eduperson_entitlement - User Attribute Name:
eduPersonEntitlement
Note: For other attributes, create a mapper similar to the
eduPersonEntitlementmapper.- Name:
Client Migration to Keycloak
All the clients that were registered in MITREid Connect have been moved to Keycloak preserving all the options (Client ID, Client Secret, Redirect URIs etc.), so you do not need to re-register your Service.
Endpoints
The first thing you need to do is to update the OIDC endpoints according to the OP Metadata. If the Application/Library supports Dynamic Discovery, then you need to update on the issuer. Otherwise, you need to update all the Endpoints separately.
Size of the Tokens
The size of the Access/Refresh Tokens that are issued by Keycloak is larger of the respective Tokens created by MITREid Connect. For example, the size of an Access Token is around 1400 characters, depending on the information that are included in the payload of the JWT. So make sure that your OIDC implementation can handle larger Tokens.
Logout
The Redirect URI query parameter in the logout request has been changed from redirect to post_logout_redirect_uri and must be URL encoded. Also, the value of the post_logout_redirect_uri must be defined in the **Valid Redirect URIs** of the Service configuration in the EGI Federation Registry.
Token Introspection
The Token Introspection is available to all the clients that are using any authentication method (client_secret_basic, client_secret_post, client_secret_jwt or private_key_jwt) (Confidential Clients) to the Token Endpoint. Public Clients (clients that do not use any authentication method) will not be able to get a successful response from the Introspection Endpoint. Saying that, the "Introspection" option in the EGI Federation Registry will be removed.
Common issues
Error messages referring to missing code_challenge, code_challenge_method or code_verifier HTTP parameter
If you get error messages containing the PKCE HTTP parameters, probably the PKCE mode is enabled in your Service Configuration but the Application is not performing the PKCE mode.
To solve this, you need to contact aai-support@ni4os.eu and ask to disable the PKCE mode for your client.
Error messages referring to invalid_code
If you try to perform the Authorization Code flow and you get an invalid_code error message, probably the Application sends the authorization request to the Authorization Endpoint of the Keycloak based EGI Check-in OP and then sends the code to the Token Endpoint of the MITREid Connect based EGI Check-in OP or vice versa.
To fix this you need to verify that you have updated all the OIDC Endpoints with the Keycloak ones. You can find all the OIDC Endpoints of Keycloak in the OP Metadata.
Error messages referring to the redirect_uri
If you try to perform the Authorization Code flow and you get an
invalid_redirect_uri error, probably the redirect_uri in the Authorization
Request mismatches with the Allowed Redirect URIs in the Service Configuration.
To solve this, you need to contact aai-support@ni4os.eu and add the redirect_uri to your client configuration.
UserInfo invalid_token or 401 Unauthorized error response
If you are trying to make a request to the UserInfo Endpoint and the response contains the invalid_token error message, probably you are using an invalid Token or the UserInfo endpoint is wrong.
To solve this, please make sure the that:
- You have obtained an Keycloak issued Access Token and you make a request to the Keycloak based UserInfo Endpoint
- You have added the Access Token to the Authorization header of the request
SAML Service Provider
To enable federated access to a web-based application, you can connect to the SAML Identity Provider (IdP) interface of NI4OS-Europe Login as a SAML Service Provider (SP). Users of the application will be redirected to NI4OS-Europe Login in order to log in, and the NI4OS AAI can authenticate them using any of the supported backend authentication mechanisms, such as institutional IdPs registered with eduGAIN or Social Providers. Once the user is authenticated, the NI4OS AAI will return a SAML assertion to the application containing information about the authenticated user.
Metadata registration
SAML authentication relies on the use of metadata. Both parties (you as a SP and the NI4OS AAI IdP) need to exchange metadata in order to know and trust each other. The metadata include information such as the location of the service endpoints that need to be invoked, as well as the certificates that will be used to sign SAML messages. The format of the exchanged metadata should be based on the XML-based SAML 2.0 specification. Usually, you will not need to manually create such an XML document, as this is automatically generated by all major SAML 2.0 SP software solutions (e.g., Keycloak, Shibboleth, SimpleSAMLphp, and mod_auth_mellon). It is important that you serve your metadata over HTTPS using a browser-friendly SSL certificate, i.e. issued by a trusted certificate authority.
You can get the metadata of the NI4OS AAI IdP Proxy on a dedicated URL: https://aai.ni4os.eu/proxy/saml2/idp/metadata.php
Metadata
Metadata provided by your SP should contain a descriptive name of the service that your SP represents in at least English. It is recommended to also provide the name in other languages which are commonly used in the geographic scope of the deployment. The name should be placed in the <md:ServiceName> in the <md:AttributeConsumingService> container.
Attributes
The NI4OS-Europe Login IdP is guaranteed to release the following attributes:
- Community User Identifier (CUID) which is a globally unique, opaque, persistent and non-reassignable identifier identifying the user (voPersonID). For users whose community identity is managed by NI4OS-Europe Login, this identifier is of the form <uniqueID>@ni4os.eu. The <uniqueID> portion is an opaque identifier issued by NI4OS-Europe Login
- Email address (mail)
- Display name (displayName)
- Given name (givenName
- Family name (sn)
A more extensive list of all the attributes that may be made available to Service Providers is included in the following table:
| Attribute friendly name | Attribute OID | Example value |
|---|---|---|
| voPersonID | urn:oid:1.3.6.1.4.1.25178.4.1.6 | n472285@ni4os.eu |
| subject-id (deprecated - see voPersonID) | urn:oasis:names:tc:SAML:attribute:subject-id | n472285@ni4os.eu |
| urn:oid:0.9.2342.19200300.100.1.3 | john.doe@example.org | |
| displayName | urn:oid:2.16.840.1.113730.3.1.241 | John Doe |
| givenName | urn:oid:2.5.4.42 | John |
| sn | urn:oid:2.5.4.4 | Doe |
| eduPersonAssurance | urn:oid:1.3.6.1.4.1.5923.1.1.1.11 | TBD |
| eduPersonScopedAffiliation | urn:oid:1.3.6.1.4.1.5923.1.1.1.9 | faculty@example.org |
| eduPersonEntitlement | urn:oid:1.3.6.1.4.1.5923.1.1.1.7 | urn:mace:geant:ni4os.eu:group:test-group:role=member#aai.ni4os.eu |
Attribute-based authorisation
The NI4OS-Europe Login service provides information about the authenticated user that may be used by Service Providers in order to control user access to resources. This information is provided by the NI4OS-Europe Login IdP in the SAML attribute assertion. The table below lists the SAML attributes that are relevant for user authorisation:
| Description | SAML Attribute |
|---|---|
| Group membership/roles of the authenticated user | eduPersonEntitlement |
| Level of Assurance (LoA) | eduPersonAssurance |
Example SAML Service Provider Configurations
Keycloak
If you are using Keycloak as an SAML Service Provider, then you need to follow the steps below in order to register EGI Check-in as an Identity Provider:
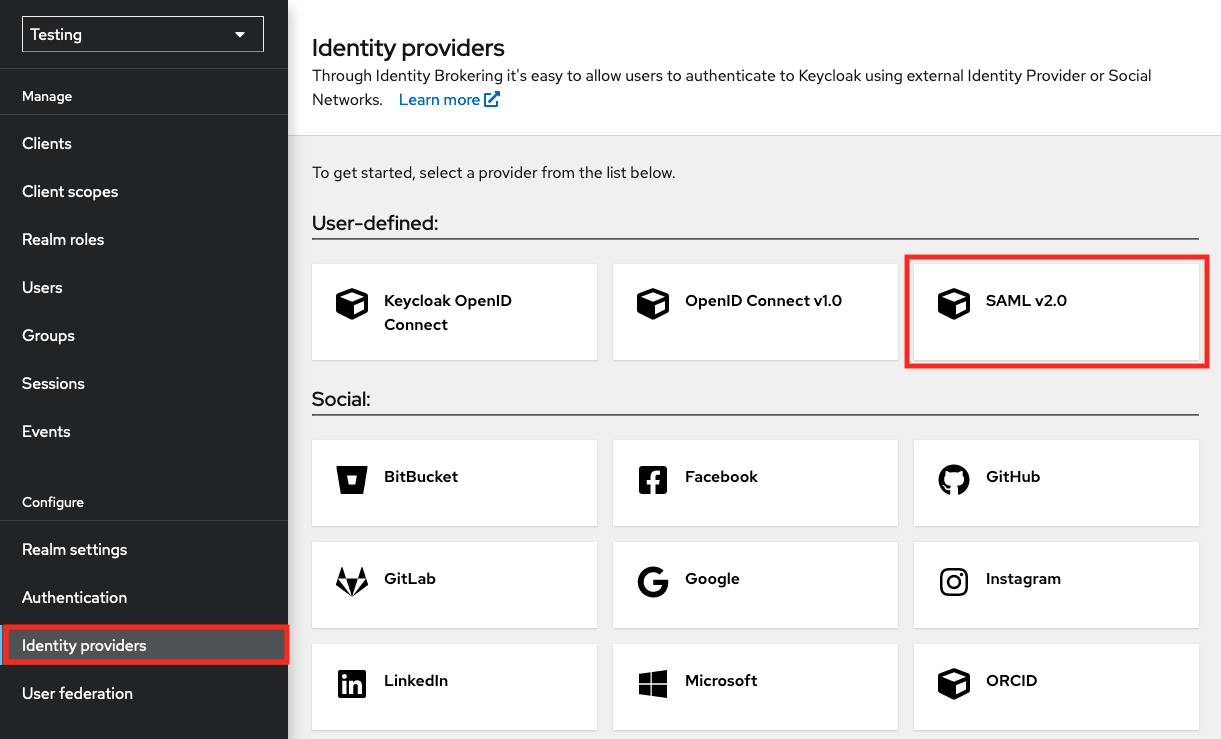
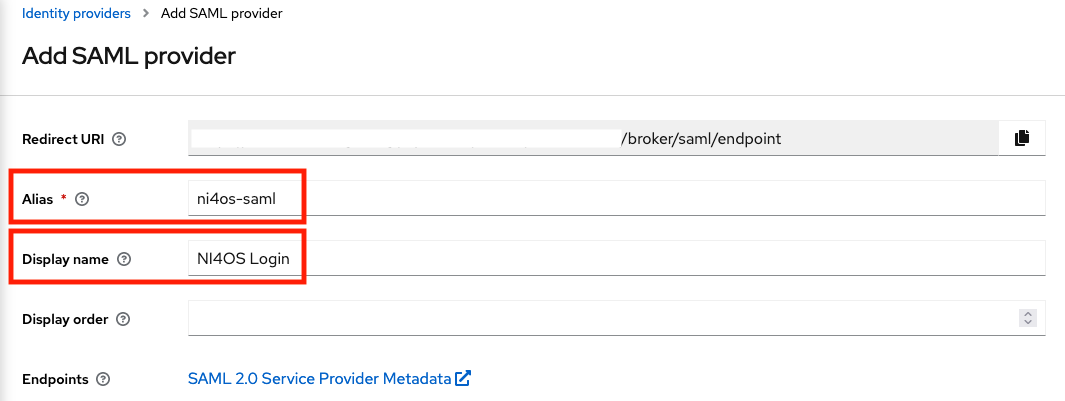
Access the administrator console of your Keycloak instance and navigate to "Identity Providers" and then select "SAML v2.0"
In the next page, complete the following fields:
- Alias:
egi-check-in-saml - Display name:
EGI Check-in
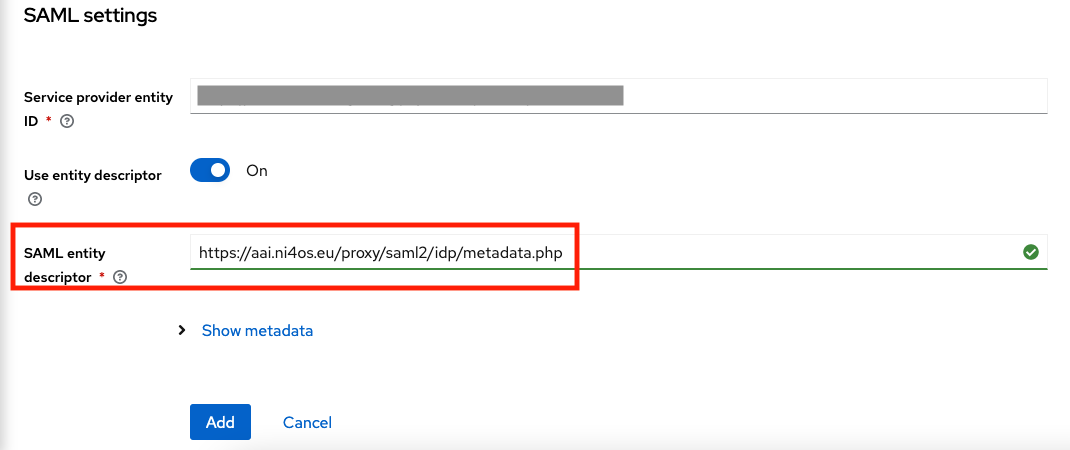
Scroll down, and complete the rest options:
- SAML entity descriptor:
https://aai.egi.eu/proxy/saml2/idp/metadata.php
And then click on the "Add" button.
- Alias:
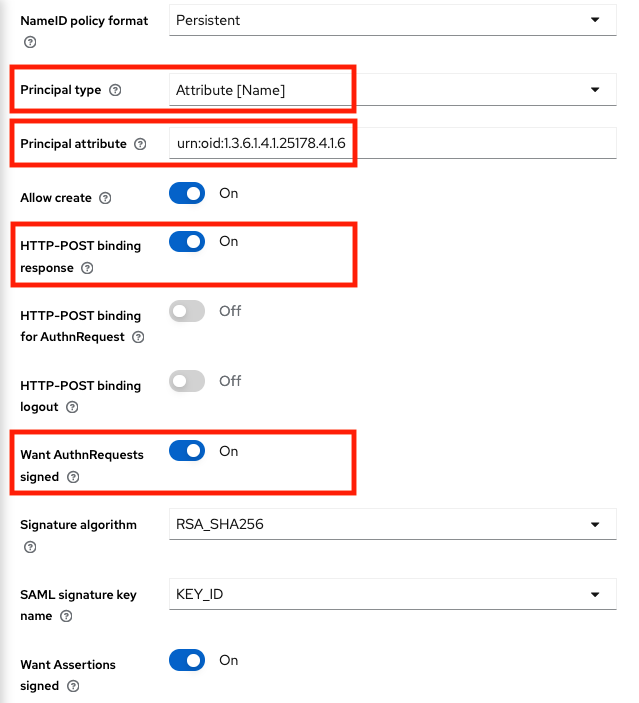
After adding EGI Check-in IdP, scroll down to the "SAML settings" section and edit the following options:
- Principal type:
Attribute [Name] - Principal attribute:
urn:oid:1.3.6.1.4.1.25178.4.1.6 - HTTP-POST binding response:
On - Want AuthnRequests signed:
On
Note:
urn:oid:1.3.6.1.4.1.25178.4.1.6is the OID presentation of voPersonID attribute.- Principal type:
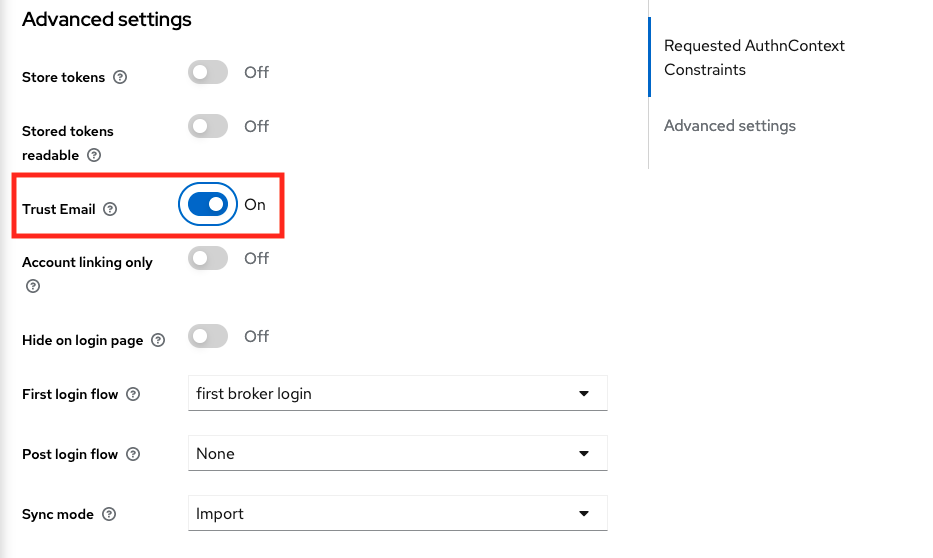
Then, scroll down to the "Advanced settings" section and enable the "Trust Email" option and click on "Save".
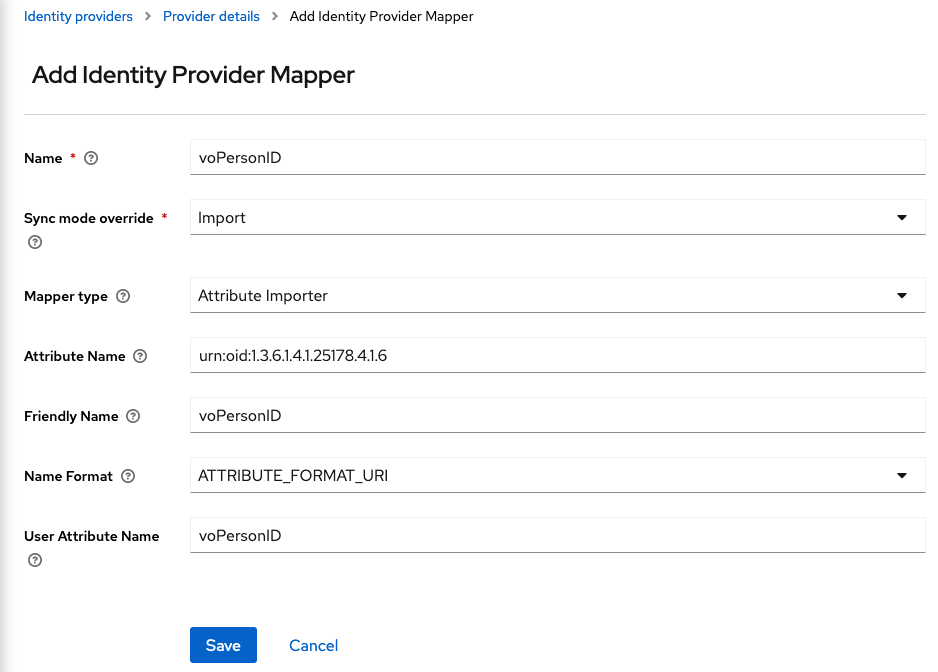
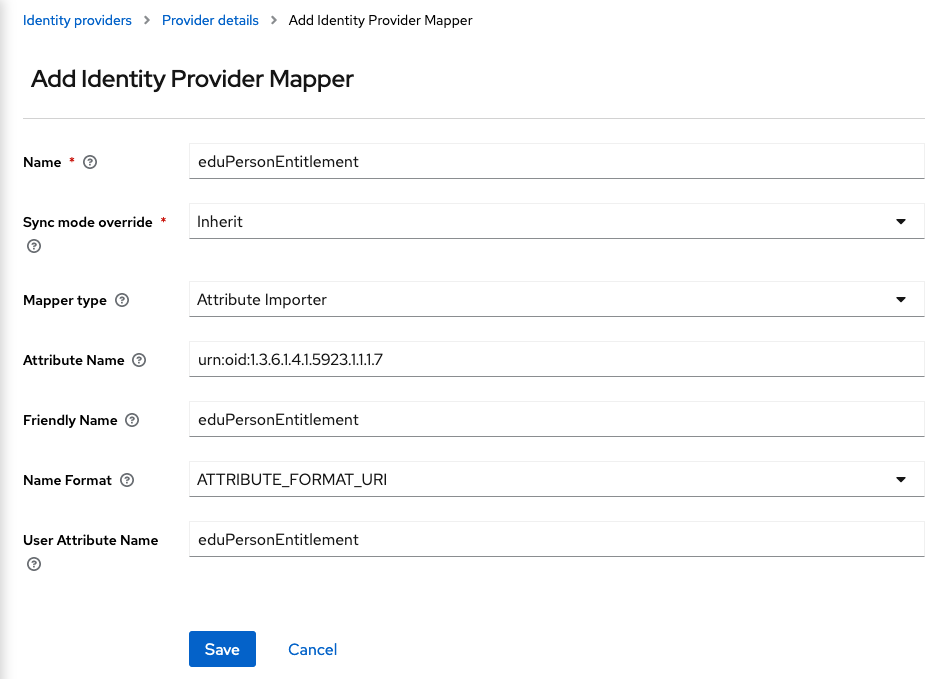
Next, you will need to create a mapper for each attribute that your Service Provider will request from EGI Check-in Proxy. Go to the "Mappers" tab and then click on "Add Mapper".
For the
voPersonIDattribute you will need to add the following options:- Name:
voPersonID - Sync Mode Override:
import - Mapper Type:
Attribute Importer - Attribute Name:
urn:oid:1.3.6.1.4.1.25178.4.1.6 - Friendly Name:
voPersonID - Name Format:
ATTRIBUTE_FORMAT_URI - User Attribute Name:
voPersonID
And for the
eduperson_entitlementclaim:- Name:
eduPersonEntitlement - Sync Mode Override:
Inherit - Mapper Type:
Attribute Importer - Attribute Name:
urn:oid:1.3.6.1.4.1.5923.1.1.1.7 - Friendly Name:
eduPersonEntitlement - Name Format:
ATTRIBUTE_FORMAT_URI - User Attribute Name:
eduPersonEntitlement
Note: For other attributes, create a mapper similar to the
eduPersonEntitlementmapper.- Name:
